
In recent years, I’ve been spending more time on the command line, thanks to the growing number of powerful and helpful tools available. One quick win I had overlooked for too long was PowerShell. With just a few simple functions and aliases, I’ve transformed it into my go-to workspace. Read on to learn how and why!
PowerShell 5 vs 7
With Windows 11 you still only get PowerShell v5.1 as default. To take advantage of the latest features; install the v7.x version.
Simply having the proper operators for or and and is a good enough reason (&& and || rather than -and and -or). Version 7 just feels more like home for a developer.
Check what version you are running with the following command:
$PSVersionTable.PSVersionNote that Powershell 5.x uses the powershell.exe executable, while the 7.x version uses pwsh.exe.
Read more about the differences here: Differences between Windows PowerShell 5.1 and PowerShell 7.x
PowerShell 7.x installation
Install and update it through winget:
winget install Microsoft.PowerShellPwsh profile
You can change the default pwsh profile by editing it with your favorite editor (e.g. vscode).
Run the following command in the terminal:
code $PROFILE.CurrentUserAllHostsNote that you might have to change your PowerShell execution policy to be able to run your Powershell profile in your terminal (depending on your current execution policy and the terminal you’re using). Setting the policy to RemoteSigned will allow you to run scripts that are written locally:
Set-executionpolicy RemoteSignedRead more about execution policies here: About execution policies
Below we’ll explore a few examples of what I’ve added to my default profile.
Set-Alias to the rescue
With the PowerShell Set-Alias command, you can configure your own shortcuts for commands. You might already have some commands (such as grep) in muscle memory. Pointing grep to Select-String is a simple solution to take advantage of this.
Here are some examples of what I’ve added to my pwsh profile:
# make the grep alias run select-string
Set-Alias grep sls
# make touch run new-item
Set-Alias touch ni
# make nc run test-connection
Set-Alias nc Test-Connection
# make codei run vscode insiders version
Set-Alias codei "C:\Users\$env:USERNAME\AppData\Local\Programs\Microsoft VS Code Insiders\Code - Insiders.exe"
Adding some convenience functions to the profile
Some PowerShell commands are just inconvenient to use, and can be improved by wrapping them in a function.
For example Stop-Process, executed something like this: Stop-Process -Name notepad -Force. If we wrap it in a function we can shorten this to kill notepad.
Additionally we just make sure it can take in both a process name and a process ID, so we can use it like this: kill 1234 or kill notepad.
# set up alias for new function
Set-Alias kill KillProcess
Set-Alias killps KillProcess

# make it quicker to type
function KillProcess {
    param($processNameOrId)

    # Check if input is numeric (process ID)
    if ($processNameOrId -match '^\d+$') {
        Stop-Process -Id $processNameOrId -Force
    } else {
        Stop-Process -Name $processNameOrId -Force
    }
}
Sometimes commands can also be hard to remember. For instance, I always forget how to list the installed .NET SDKs: dotnet --list-sdks.
By wrapping this in a function I can make it easier to remember:
# add an alias every time I get it wrong
Set-Alias dotnetversion dotnetversions
Set-Alias dotnetsdks dotnetversions

# wrap it in a function to make it easier to type and remember
function dotnetversions {
    dotnet --list-sdks
}
Other things I typically forget is how to print environment variables and printing the content of the path.
Again, wrapping these in new functions and adding aliases to the rescue:
# print environment variables
function Print-Envs {
    dir env:
}

# adding a new entry every time I get it wrong:
Set-Alias listenvs Print-Envs
Set-Alias printenvs Print-Envs
Set-Alias envs Print-Envs
Set-Alias echoenvs Print-Envs
Set-Alias echo-envs Print-Envs

# print path content
function Print-Path {
    $env:path
}

# adding a new entry every time I get it wrong
Set-Alias echopath Print-Path
Set-Alias echo-path Print-Path
Set-Alias path Print-Path
Set-Alias printpath Print-Path
Set-Alias listpath Print-Path
Faster switching between directories
There are some directories I use more than others. By adding a goto function to switch between these, I can get short commands into my muscle memory to quickly navigate to where I want to be. Some simple examples below. The longer the path is to the directory I want to go, the more convenient it is to have a “goto short key” for it (e.g. goto tmp)
# usage example: goto tmp
function goto {
    param($directory)
    if ($directory -eq "tmp") {
        Set-Location "D:\tmp"
    } elseif ($directory -eq "git") {
        Set-Location "C:\git"
    } else {
        Set-Location $directory
    }
}
Simple watch command
Certain Linux command-line tools are simply indispensable. For me, one such tool is watch. To address the absence of watch in Windows, I added a simple implementation of it to my PowerShell profile.
# usage example - run a single ping every 2 seconds: watch ping -n 1 cognitiveoverload.blog 2
function watch {
    param (
        [Parameter(ValueFromRemainingArguments = $true)]
        [string[]]$Args
    )

    if ($Args.Count -eq 0) {
        Write-Host "Usage: watch <command> [args ...] <interval>"
        return
    }

    $lastArg = $Args[-1]
    if ($lastArg -as [int]) {
        $Interval = [int]$lastArg
        $Command = $Args[0..($Args.Count - 2)] -join ' '
    } else {
        $Interval = 2
        $Command = $Args -join ' '
    }

    $iteration = 0
    while ($true) {
        $iteration++
        $dots = "." * $iteration
        $output = Invoke-Expression $Command
        if ($output) {
            $iteration = 0
            Clear-Host
            Write-Host "Current Date and Time: $(Get-Date -Format 'yyyy-MM-dd HH:mm:ss')" -ForegroundColor DarkCyan
            Write-Output $output
        } else {
            Clear-Host
            Write-Host "Current Date and Time: $(Get-Date -Format 'yyyy-MM-dd HH:mm:ss')" -ForegroundColor DarkCyan
            Write-Output "No output from command$dots"
        }
        Start-Sleep -Seconds $Interval
    }
}
Poor mans Bang Bang
Another trick you might be familiar with from Linux would be the bang bang command (!) to execute a previous command. In pwsh the ! character is reserved as the NOT operator and cannot be set as an alias. We can still use the Get-History and Invoke-History commands though, to cook up something similar:
# create an alias for Get-History to make it quicker to type
# note that "history" should already be an alias for Get-History
Set-Alias hist Get-History
# use the § character rather than ! to create a shortcut for Invoke-History
Set-Alias § Invoke-History
# create the §§ function to invoke the previous command
function §§ {
Invoke-History (Get-History -Count 1)
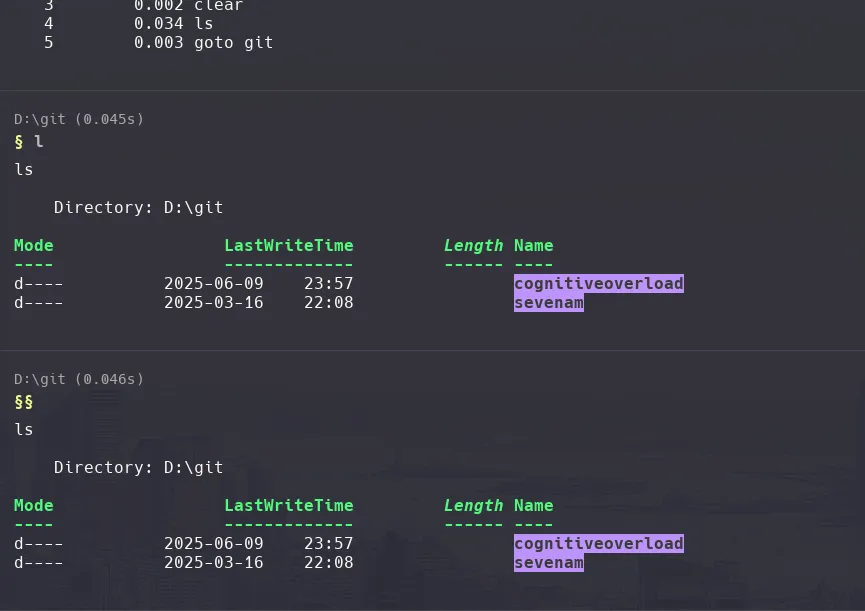
}Now we can use § l to run the previous command starting with l as shown below, and then run the previous command with the bang bang: §§
Now that we’ve configured our PowerShell profile with some helpful functions, we need to make sure we can take advantage of this in our dev environment as well. We need update our IDE to use pwsh.exe, so it loads the profile. See below how to do that in Visual Studio and VS Code.
Setting pwsh as the default shell in Visual Studio
To set it as the default terminal shell in Visual Studio, go to Options => Terminal => Choose PowerShell 7 and click “Set as Default”:

Setting pwsh as the default shell in Visual Studio Code
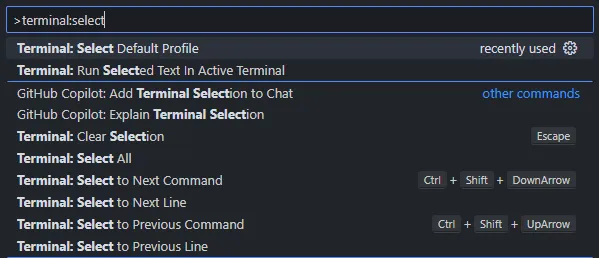
To set it as the default terminal shell in Visual Studio Code, use the command palette and start typing “terminal: select default profile”:
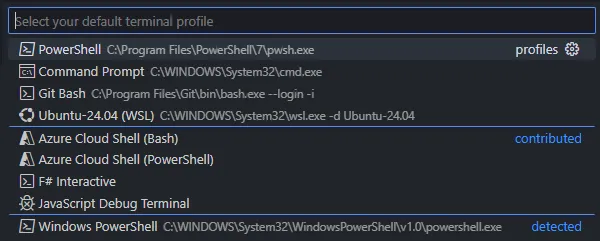
On the next popup; select “pwsh.exe”:
Setting pwsh as the default shell in PowerToys Run
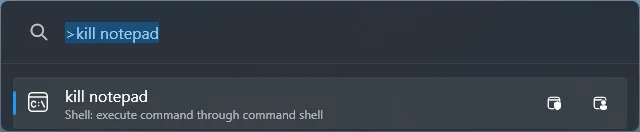
To take further advantage of our new PowerShell profile, we can also integrate it into PowerToys Run. We can do that by setting the default shell configuration to use PowerShell 7 (pwsh.exe):
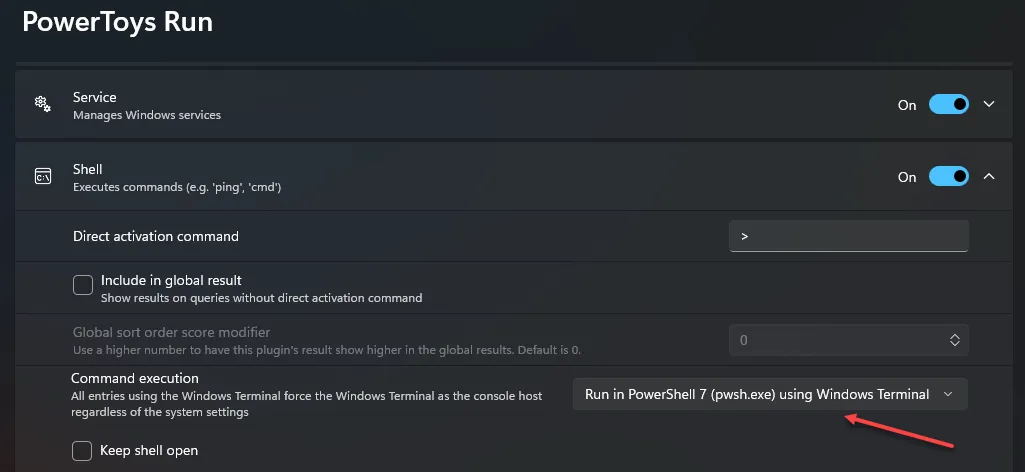
Note that you can also choose to keep the shell open after executing a command if you like to.
Now we can trigger PowerToys Run and execute our custom comands (like >kill notepad) without having to open a terminal window first. This is a great way to quickly run commands without leaving your current context.
If you don’t have PowerToys installed, you can install it through winget:
winget install Microsoft.PowerToysIf you are using PowerShell to your advantage in any other way, I’d love to hear about it!
Find my contact info here