
References:
https://neovim.io/
https://github.com/neovim/neovim
https://github.com/nvim-lua/kickstart.nvim
Neovim
Well, to be fair, this post will not actually be about Vim, but rather Neovim, a Vim-fork that has taken it all in new and exciting directions.
Let’s have a quick look back at how we got here:
- 1976: Original code for vi written as the visual mode for a line editor called ex and released as part of the first BSD Unix
- 1979:
vireleased with the second version of BSD Unix - 1991:
vim(vi improved) released on Amiga - 2014:
neovimreleased as a fork ofvimfocused on extensibility and usability - 2025: Thanks to restructured APIs and Lua scripting: a lot of community plugins are now available making it a great all-round IDE
Some of its advantages comes directly from its heritage. It’s still very fast, lightweight, and can run in a terminal. Since it can run in a terminal, there’s nothing stopping you from running it inside the terminal in Visual Studio, VSCode or other IDEs! For example if you try to open the root README.md file of a project in Visual Studio, the built in file search will often not find that file. Switching to the terminal and opening it with neovim works perfectly fine though!
Additionally, it’s cross-platform (you can run it anywhere, even without a graphical interface) and the use of Lua as a scripting language has opened up so many possibilities for plugin developers, leading to a rich ecosystem of extensions that makes it incredibly customizable.
Installation
For installation instructions, check out the official Neovim installation guide: https://github.com/neovim/neovim/blob/master/INSTALL.md.
For Windows users, you can easily install with winget:
winget install Neovim.NeovimOnce installed, you can launch neovim by typing nvim in your terminal.
Getting started with configuration and plugins
While it’s great that Neovim is extensible, these plugins can be a bit overwhelming to set up and hours could easily be lost configuring and tweaking them to work together.
Fortunately, there are some great starter configurations available that bundle a lot of useful plugins and settings together. A really good place to start is kickstart.nvim, which provides a solid foundation for building your own Neovim setup. This video by TJ DeVries walks you through the configuration and how to get started: The only video you need to get started with neovim.
My own config is based on kickstart.nvim and is available on my github: https://github.com/sevenam/nvim-config
Let’s start by creating a new config file. On Windows, create the init.lua file in the following location with PowerShell:
# creating the init config file
ni c:\users\$env:USERNAME\appdata\local\nvim\init.lua
# open the config file in neovim
nvim c:\users\$env:USERNAME\appdata\local\nvim\init.lua
Grab the contents of kickstart.nvim’s init.lua, press i to enter insert mode, paste it in the file. Save and exit neovim by typing :wq.
Start neovim again by typing nvim in your terminal and you should be kick started!
Plugin management
To facilitate installation, updates and removal of plugins, a plugin manager is essential and there are several options available (it’s easy to get lost even before getting started!). Personally I went for lazy, but here’s a list of alternatives:
If you go with lazy, which comes with the kickstart, you can start it by typing the following command:
:Lazy
Once started you can access the menu options for update/sync/clean/etc by pressing Shift + the respective letter on the menu. E.g. Shift+U to update.
Plugins
Now that we’ve got a plugin manager, we can start adding some useful plugins to enhance our Neovim experience. Here are some popular ones worth checking out:
- telescope.nvim: A fuzzy finder ala VSCode’s Ctrl+P: https://github.com/nvim-telescope/telescope.nvim
- dropbar.nvim: A highly-customizable winbar for Neovim with drop-down menus: https://github.com/Bekaboo/dropbar.nvim
- nerdtree: A file system explorer: https://github.com/preservim/nerdtree
- nvim-tree: An alternative file explorer: https://github.com/nvim-tree/nvim-tree.lua
- bufexplorer: A buffer (open files) explorer: https://github.com/jlanzarotta/bufexplorer
- toggleterm.nvim: Terminal integration: https://github.com/akinsho/toggleterm.nvim
Vim basics
Modes
Neovim retains the modal editing paradigm of Vim, which can be a bit of a learning curve for new users. Here are the basic modes you’ll need to know:
- Command Mode (Esc to go back to this mode)
- Insert Mode (i to enter this mode)
- Visual Mode (mouse or CTRL+v)
Quickly summarized: Command mode for typing commands and navigating, Insert mode for inserting/writing text, and Visual mode for selecting text.
Navigation
In command mode, you can navigate through the text using the following keys (or use the arrow keys):
- h: ← (left)
- j: ↓ (down)
- k: ↑ (up)
- l: → (right)
But, that’s just weird… why?
When Bill Joy created the original vi editor, he used the ADM-3A terminal, which ad the arrows on the hjkl keys. Naturally he used the same keys. Here’s how the hjkl keys looked like:
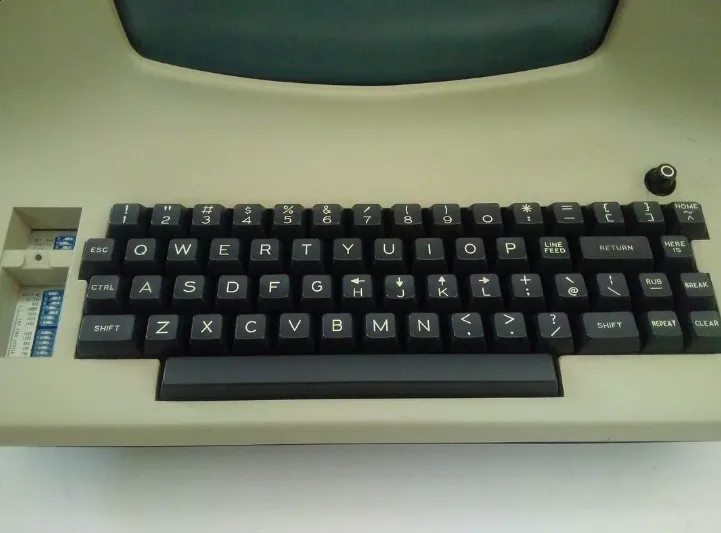
The location of these keys allows for efficient navigation without moving your hands away from the home row, which makes it faster as there is less hand movement.
Commands
In command mode you can execute commands by typing : followed by the command, or by executing shortcuts. Here are some basic commands to get you started:
:w- Save the current file:q- Quit Neovim:wq- Save and quit:q!- Force quit without saving
And some shortcuts for common actions:
yy- Yank (copy) the current linep- Paste the yanked text below the current lineP- Paste the yanked text above the current linedd- Delete the current line3dd- Delete 3 lines starting from the current lineu- Undo the last actionCtrl+r- Redo the last undone action
Buffers (open files)
In Vim open files are called buffers. You can have multiple buffers (files) open at the same time and switch between them. Here are some basic buffer commands:
:ls- List buffers:bn- Switch to the next buffer:bp- Switch to the previous buffer:bd- Delete (close) the current buffer:b1- Switch to buffer 1 (replace 1 with specific buffer number)
Registers (fancy pants copy/paste)
In Vim, registers are used to store text that you have yanked (copied) or deleted. You can think of them as clipboards (yes, in plural!). Here are some basic register commands:
- “ayy - Yank the current line into register ‘a’
- “ap - Paste the contents of register ‘a’
- List all registers and their contents
Learn by playing a game
If you want to learn more about Vim/Neovim in a fun and interactive way, check out VIM Adventures!